Pages

Friday, April 20, 2012

A couple of cards using Cracked Glass Technique

There are some techniques that I fall in love with, create a bunch of stuff using it and forget about it once I learn the next cool technique.  That was the case with this technique.  I was going through my scrapbook room, you know doing the quarterly clean out, and ran across something that had this technique used on it.  SO I thought I would give it a try with this new stamp set from CTMH "Quick Cards Butterfly" and the GORGEOUS paper from "Florentine".


 Honestly, I am not even sure if this is the correct name for the technique.  BUT we are going to call it Cracked Glass for this post!  For this technique, you need Versa Mark, Clear Detail Embossing Powder and a Heat Gun.  Simple so far!  After you have stamped your favorite image on a piece of CS, you will cover the ENTIRE piece of CS with Versa Mark...then pour the Embossing Powder all over the top so you have a nice layer of powder covering the entire piece of CS.  Heat until melted.  Repeat the VersaMark and Embossing Powder step again.  Heat until melted.  This time, while the embossing powder is melted and still hot, cover again with embossing powder, heat till melted and repeat these steps until you have about 5-7 layers of embossing powder.  


Once you have the number of layers that you like on your image, let it cool completely.  I have seen where some will put it in their freezer to speed up the cooling process.  Once completely cooled you will very gently fold the image until the embossed layers start to crack.  You can crack it as little or as much as you would like!  After I cracked mine, I added a bit more ink to the top, so as to get into the cracks and around the edges....for  a more antiqued look.

I am sure there are youtube tutorials out there on how to create this technique.  I just don't have time right now to post a tutorial!  BUT I hope that you were inspired to try this technique out if not for the first time, maybe revisit the technique with new papers and embellies that you have in your stash!!

Thanks SO much for stopping by!!

Happy Scrapping and Stamping!!

Jen


Tuesday, April 17, 2012

May Card Class - Lucy

Happy Tuesday!!  Last night's card class was SO much fun!!  I have to admit that I was pretty nervous as to how it would turn out.  I have been holding monthly scrapbook groups for the past 4 years, but this was my first attempt at starting a monthly card class and I was not sure how long it was going to take to create 2 each of the 4 cards that I had pre-cut for.  All in all I think it turned out GREAT!!

I am SO excited to say that 8 girls have signed up to start our Monday Card Class!!  In May we will be creating these 4 sweet cards using the papers and embellishments from the Lucy WOTG kit.  I did add a pack of Licorice Opaques as the Grey Wool opaques coordinate PERFECTLY with the colors in Lucy.

Take a close look at card #1 on the ribbon...the pink is a Rub-On.  Also take a closer look at card #3.  The main image is a RUB-ON with a few sparkles to bling it up!  Oh the things we can do with Rub-Ons!  Who knew they could be so much fun??

These are the 4 cards that we will be making in our May class....


Supplies used: 
Paper: Lucy 
Stamps: Lucy WOTG set, New Arrival, A Garden and Heartfelt Treasures
Embellies: Color-Ready Seam Binding Ribbon, Licorice Opaques, Bitty Sparkles, Lucy Rub-Ons, White Hemp and Pink Assortment Buttons

If you would like to attend this card class in May, check out my EVENTS page for pricing and kit content details.  

Thanks SO much for stopping by!!

I hope that this has inspired you to take another look at the Rub-Ons that you have in your stash!  They can be used as main image, a border, an accent to an image OR added to "plain" ribbon to fancy it up!

Happy Scrapping and Stamping!!

Jen

Thursday, April 12, 2012

Dotty for YOU!!!

In Celebration of National Scrapbooking Month, Close to my Heart is offering the AWESOME paper pack "Dotty for You"!!  Starting April 17th - May 31st OR WHILE SUPPLIES LAST, you can purchase this 24 pack of double sided paper for just $5 when you purchase $35 in CTMH products.  You will receive 2 each of 12 different patterns PLUS on the reverse side there is this DARLING polka dot print in different colors!!

I am SO loving it and cannot wait to show you more projects, pages and cards as I dive into all these scrumptious papers!  I really LOVE the butterfly paper that comes in this pack and imagined it would make some pretty darn cute cards.  SO that is what I made first!

These cards are a bit simple...but they are pretty sweet as well.  They are a smaller size than I normally would make.  They are 3 x 4 3/4 and are just cute as a button!  While at Leadershare in March, one of my CTMH Sistas made a few cards this size and I fell in love with them!

ANYHOO....here they are!!


My first card uses a sentiment from "4 My Friend" which is quickly becoming my favorite stamp set for cards!!  The tab on the sentiment is from the Smoothie Mini Medley.


The 2nd card also uses a sentiment from "4 My Friend" along with ribbon and brads from the Smoothie Mini Medley.  If you look closely, or click on the photo to enlarge, you will see that not only did I distress with Grey Wool ink, but I also took my Edge Distresser to give it a bit more dimension.

Thanks SO much for stopping by!!

I hope that this inspires you to try a different card size than you would normally make AND to also get yourself one of these SUPER CUTE paper packs when they come available on April 17th!!!  For you paper horders...you may even want to stock up and get yourself a couple, one to cut into and one to hold onto!!!

Happy Scrapping and Stamping!!

Jen


Tuesday, April 10, 2012

April Card Class - Pemberley

I am starting my VERY FIRST monthly card class THIS month!!  A brief story as to how I was coerced into starting a monthly card class.  At the beginning of March, while away at a weekend scrapping retreat with a bunch of my girlfriends, my AMAZING friends BEGGED me to start a card class.  They had attended my scrapbook groups for 4 years (since I started) and were a bit burned out, not to mention that they had stacks of group pages that still needed photos put on them.  BUT they did not want to stop taking classes altogether.  SO they told me that if I started a card class they would join!  I was hesitant as I had only held scrapbook groups, not card groups.  They would NOT take NO for an answer.  SO this is what I came up with....

I chose the paper pack "Pemberley" to start my first card class with.  I LOVE this paper pack as it can be both masculine and feminine at the same time.  The blue hues along with the subtle yellows and tans are SO calming to me.  Even though there are flowers, they are not too girly to give to a guy!

We will be making 2 each of the following 4 cards.  I used the "Pemberley" WOTG kit along with a few extra stamp sets to create the cards.


The sentiment on the first card comes from the "Hooray Bouquet" stamp set .  The flower along with the 2 circles in the center were cut using the "Art Philosophy" Cricut Cartridge.  You can also STAMP the flower using one of the cute flowers in the "Hooray Bouquet" stamp set.


The 2nd card uses the stamp set "Play Day".  To create the "brushed" look on the image, I swiped the stamp across the stamp pad.  EASY PEASY!  The ink just naturally pools at the edge of the image, depending on how hard you press when you swipe across.


The 3rd card uses the stamp set that comes in the "Pemberley" WOTG kit.  The flower was stamped first on Colonial White CS in Desert Sand Ink the again on the patterned paper from the kit.  I cut out both images, but only the top of the flower for the 2nd image, then pieced and pop dotted the whole image for dimension.  


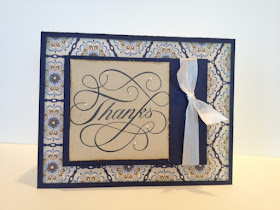
The 4th and final card is my 2nd favorite!  The first being the one right above this one!  The sentiment is from the "Thanks" Stamp set.  There is only 1 image in this set for the LOW price of just $6.95!  There are SO many things you can do with this ONE stamp!  LOVE IT!!!  

SO there you have it....my FIRST set of cards for my FIRST monthly card class!  I am SO STINKING  EXCITED for it to start next Monday!!  

Thanks for stopping by!!  

I hope that this has inspired you to start your OWN card class!  Maybe you have been thinking about starting one, but you were not sure how you were going to do it, or if you were creative enough to come up with cards that your customers would like to make.  ALL I CAN SAY IS IF I CAN DO IT....SO CAN YOU!!!

Happy Scrapping and Stamping!!!

Jen

Thursday, April 5, 2012

I'm BACK!!!

First of all, I would like to apologize for my absence over the past several months.  While I have not been posting here to my blog, I have been posting to my Meetup.com group site Scrappin' and Stampin' Made Easy but Beautiful which has kept me fairly busy!  Which is a GREAT thing!!!  BUT I have had a few of my blog followers ask if I would also update here as well.  SO I AM!!

If you noticed at the top of my blog I have added a second page.  This is where I will be adding my upcoming crops, workshops and scrapbook group events.  If you would like to attend one of my events, please visit my Meetup.com group site to RSVP.  All of my Meetups are arranged by date first then the time of the meetup.  

I am going to start with my most recent card that I created using Close to my Heart's "Art Philosophy" Cricut Cartridge.  Did you know that this cartridge has a card function that cuts out an image from the front of the card??  It DOES!!!  When I first discovered this function, I have to be honest, I was not exactly sure how I was going to decorate around a whole in the middle of my card.  But let me tell you this...once I figured out HOW I was going to cover it, I fell in love with this function!!


For this card, I cut out 4 cards using 4 different papers from the "Florentine" paper pack.  The base for my card was cut in Vanilla Cream CS.  The second was the Creme Brulee patterned paper,  the third was the Twilight patterned paper and the 4th was the floral print patterned paper.  

You might think that it would be wasting too much paper to cut out all those cards....Well maybe you are right!  LOL  But I was "playing" around trying to find just the right combo of colors, so ended up cutting out 4 different cards.  It really is not a waste if you were to cut out 4 card bases using Vanilla Cream CS and use each of the left over parts to create 4 different cards using the same cut out.  Clear as mud??  LOL


The placement of the trees and house on the inside of the card is EASY PEASY.  Just close the card and use the front as a template to stick your trees and house into.  Maybe I will do a photo tutorial to SHOW you how I did it....kind of hard to explain with just words.  

ANYHOO....Thanks SO much for stopping by and for sticking around for this long!!

I hope that this has inspired you to play around with some of the FUN functions on the "Art Philosophy" Cricut Cartridge from Close to my Heart!!  

Happy Stamping and Scrapping!!

Jen