Pages

Sunday, December 7, 2014

Joyful Christmas Wreath

You know how I can't resist a good sketch challenge...well I wanted to share Viva la Verve's sketch challenge for the month of December.  This was different from the other challenges I have followed in that they have included cutting directions to create 4 cards.  So of course I HAD to play along!!


If you go to Viva la Verve's blog, you can print out the above cutting diagram and 4 cards.  They recommend using 2 sided paper, but I did not want to use patterned paper with this stamp.  SO I cut one out of Real Red CS and one out of Pear Pizzazz.  Technically, I will be able to make 8 cards out of two 6x6 pieces of CS.  So far, I have only made the 4.  


I LOVE this stamp set and Framelit combo!!  Check out my Facebook Page for step by step instructions on how to use this stamp set along with the coordinating Framelit.  Facebook.com/jensscrappypages


The stamp set I used is called Wondrous Wreath along with the coordinating Wondrous Wreath Framelits Dies.


I kept these simple, only using cardstock with a sparkle...just because I can't resist using sparkles!!  


The word Joy was cut out of Brushed Silver CS, which gives it just the right amount of sheen!  Keeping this post short and sweet today!!

Thanks for stopping by!!  

Hope this inspires you to play along with this SUPER FUN sketch challenge over at Viva la Verve!!  

Happy Stamping!!

Jen

Saturday, December 6, 2014

Bringing Dots Back!

I know what you are thinking...another owl card??  When is this girl going to post a card using something different??  Well, I DID use different papers!!  I honestly had NO intention of creating another card using the Owl Builder Punch.  I even had something else stamped in its place.  BUT it just didn't look right to me.  The sentiment looked too flat.  SO I punched out yet another owl, used the flower punch as its background and knew this was the look that I was going for!!

Do you have a favorite paper crafter??  One that you check back daily to see if they have created some fabulous new creation that you are going to want to lift??  I think we all do!!  There have been quite a few over the years that inspire me to want to step out of the box and push my creativity to new levels.  One in particular was Faith Hofrichter aka Markie's Mom.  I LOVED everything she did, but in particular, I loved how she outlined the layers of her cards using either white or black dots.  

Faith no longer blogs, which breaks my heart as she was SO creative.  But I wanted to share one of her beautiful creations that inspired me to add those little white dots all around the layers on my card.  

I just LOVED the way she added not just the white dots around each layer, but on the red matting, she used black dots. I feel like it just makes everything else POP that it frames!!  I really miss her creativity...


Of course, my card is in no way, shape or form as GORGEOUS as Faith's card...I thought it turned out pretty sweet.  I was following a sketch from Viva la Verve Sketches Blog.  I really liked how the Blackberry Bliss CS popped against the Crumb Cake CS.  The patterned paper is from the Moonlight paper stack in the annual catalog.  I REALLY LIKE the size of the paper stacks as they are PERFECT for creating 4 1/2 x 5 1/2 sized cards!

Thanks SO SO much for stopping by!!  

I based my card off someone who has continued to inspire me, even after they stopped blogging.  Who inspires you??  Do you go back and revisit their creations?  The paper crafting world is ever changing and occasionally brings back trends from the past.  What are some of your favorite past trends?  Try making a card using an older trend!!  You never know...you might be the one who brings it back!!  LOL

Happy Stamping!!

Jen

Wednesday, November 26, 2014

Trio of Owls

I just can't get enough of these little guys!!  Oh the possibilities using just this one punch with ALL of my different papers and stamp sentiments!!  This card started out as kind of a "love" card by random stamping little hearts from the set Something to Say.  But as I started playing with this sketch from Freshly Made Sketches, I found myself using the sweet owl from the Owl Builder punch and my thought process changed.

I dug into my new box of SU! goodies yesterday and grabbed the Large Polka Dot embossing folder to emboss both the Real Red and Whisper White CS.  It's hard to tell from the pic, but it's there I promise!  lol 


The owl in the middle sports paper from the Santa & Co. Designer Papers.  The other 2 are sporting paper from the Back to Black Designer Papers, as well as the background that I used for my photo.  I am LOVING this 1/8 inch Real Red Taffeta Ribbon!!!  Gonna be ordering MORE of this ribbon in the different colors!  For sure in the Basic Black as it would have worked as a GREAT accent color at the top.  Of course, no card is complete without a little sparkle!!  Well, maybe not, but I sure like adding them to most of my projects!

Thanks SO SO much for stopping by today!!

I hope that this just inspired you to create something...anything...as soon as you have some free time!  If you don't have any free time, MAKE some free time for YOU!!  You deserve it!!

Happy Stampin' Up!

Jen

Tuesday, November 25, 2014

A Sweet Thank You Card

OH MY GOSH!!!  This little owl from the Owl Builder Punch is the CUTEST THING EVER!!!  Where has he been all my life??  LOL  I am like a kid in a candy store when it comes to the SU! Catalog!!  My wish list is seriously like the WHOLE catalog.  I can hardly control myself with all of the cute stamp sets, punches, dies, ribbons and embellies!!

I placed another order last week and it just came in an hour ago.  Looks like I'll be playing with my new goodies ALL DAY today, tomorrow, Thursday and Friday!!  Need to get my play time in while I am on break from school as it starts back up again next Monday.

Once again, I followed along with the Mojo Monday Sketch Challenge and once again, they did not disappoint!  This week they featured one of my favorite sized cards, the 3 1/2 x 5 1/2.  They call it "tall and skinny", I call it SUPER FUN size!  lol


I made a few cards earlier this year using a similar color combo.  I really LOVED the way the colors looked together, so when I received my Kraft CS from SU! yesterday, I knew I wanted to use it with the All Is Calm papers.  The CS is Soft Sky and Pear Pizazz.  I kept the embellishments simple, I guess as I always do, and only used Whisper White Seam Binding Ribbon and one lonely little sparkle for the center of the heart.  


I stamped the trees from the White Christmas stamp set as a background for my cute little owl to sit on.  The embossing folder is not SU!, it was one that I purchased years ago.  I really like the touch of embossing on the front of the owl.  Just gives him even more dimension.  The Thank You sentiment is from the Gifts Of Kindness stamp set.  GREAT set for all occasions!

Thanks SO much for stopping by today!!  

I hope this inspires you to either pull out your Owl Builder punch that you purchased, OR purchase one TODAY so you can start playing with it by next week!!!  I am already envisioning all the different cards this little guy is going on!!

Happy Stampin' Up!

Jen


Wednesday, November 19, 2014

A Merry Little Wish

I have to say, it feel GREAT to be creating again!!  I know that I am truly in a happy place when my creative mojo is back!!  Plus, I think I have found my niche'.  I like making cards.  Whooda thunk when I started scrapbooking years ago, that I would end up as a card maker??  Don't get me wrong, I'm not saying that I will NEVER scrapbook again.  After all, I have a TON of pics that really need to be printed and put into SOMETHING.  Just not quite sure what that something is at the moment.


 Have you checked out the sketch for Mojo Monday this week?  Well if not, here it is!!  I have been searching for some new sketch blogs and have found a couple that I am going to start participating in.  It was sad to me however, that a few of the sketch blogs that I used to visit no longer exist.  I think I will cry if the Mojo Monday blog ever stops their challenges!!  


 The card I created uses some GORGEOUS papers from the SU! Holiday Catalog called All is Calm.  They are SO wintery and soft when you put them all together.  I love the soft look of the Pear Pizzazz and Soft Sky papers and inks.  I inked both trees in Soft Sky, going over it twice to darken it, then inked over it with Pear Pizzazz.  There is also a tree punch that coordinates with the stamp set Festival of Trees, but I don't have it quite yet!


LOVING this Lost Lagoon 3/8" Silky Taffeta Ribbon that is featured in the SU! Holiday Catalog!!  The color is gorgeous and the feel of it really is silky!  I tied some Linen Thread in a knot around the trunk of each tree just to give them a bit more dimension.


I normally don't embellish or stamp the inside of my cards.  BUT this stamp set has a sentiment that is meant for the front of the card and the inside.  SO I figured, as long as I was stamping on the inside, might as well put some accent paper in there as well!!  Sorry the pic is blurry...using my iPhone to take the pics right now.

Thanks SO much for stopping by today!!  

I hope this inspires you to head on over to the Mojo Monday Blog and give this weeks sketch a try!!  You will have fun playing with it, I promise!!

Happy Stampin' Up!

Jen


Sunday, November 16, 2014

White Christmas

It snowed here in Omaha ALL day yesterday!!  It was a pretty snow.  Until you went outside to drive anywhere!  LOL  It was a soft snow, but left the roads super slick.  SO as long as you didn't have anywhere to go, it was peaceful to sit inside looking out, with a cup of hot cocoa or hot coffee in hand.  We even called for pizza to be delivered so we didn't have to leave the house last night!  

I wanted to play along with the Freshly Made Sketches challenge this week, BUT I ended up using the distressing tool to the edges of the Whisper White CS cuz it made it look "frosty" and went along with the snow theme of the card.  


Overall, I am pleased with the way it turned out.  However, it feels a bit top heavy to me.  Guess it's ok to leave part of the card "plain".  I got to play with the White Christmas stamp set finally!!  I LOVE the little car, snowman, polar bear and dear that you can add to the center of the trees.  There is even a banner that says Merry Christmas that fits between the trees as well.  Add a couple of little birds to put in the trees and it ends up being a super versatile stamp set!!  I have to admit though, the sentiments in this stamp set were a bit big for the space I had...SO I used a sentiment from the Get Your Santa On set.


Once again, I used the Aqua Painter to color the car and the trees.  I added probably more glitter than I should have, but I do love me all things sparkly!!  Paper used is from Santa & Co. plus Basic Black and Whisper White CS.  Ribbon is Whisper White Seam Binding Ribbon.  I LOVE having ribbon to play with again!!  The twine in the center is the Neutral and Old Olive Baker's Twine with the Neutral removed.  I just wanted a touch of green...so separating the Neutral from the Old Olive allowed me to do just that!!

Thanks SO much for stopping by today!!  

Hope this inspires you to create a snow scene or just get out your new goodies from the SU! Holiday catalog and just play!!  Especially if you were lucky enough to have a fresh blanket of snow covering the ground today as you woke up!!

Happy Stampin' Up!

Jen


Saturday, November 15, 2014

A Card Re-Visited

I know that I have posted before about re-visiting old cards that you have created and re-doing them with new papers and embellishments.  But maybe you are new here.  SO Let me explain a bit.  Have you ever created a card that you just LOVE??  You know, the one that you keep going back to and saying to yourself "WOW That's such a cute card!"  Why not re-create it using different papers, embellishments and stamps?  I do!!

That is what I have done with this one.  However, I was not exactly thrilled with the Real Red cardstock that I used as the base of the card and the square for the sentiment.  Last card I created using Washi Tape using this LO, I had matching CS and Washi Tape.  BUT since I don't have the coordinating CS for my Washi Tape, I used a color to match the red in Santa's suit.  It's cute and all, just think it would pop a bit more if I used a coordinating color for the Santa & Co. Designer Washi Tape.  Guess I'll just have to re-make it when I have the coordinating cs colors on Monday!!

Without further ado....my card!


I just LOVE the chunky Natural and Old Olive Two-Tone Trim that is featured in the SU! Holiday Catalog!!  It really adds a pop of color down the side of the card!  I stamped the image onto Whisper White CS two times.  One I colored and cut out to pop up onto the first image I stamped.  I only cut out the Santa suit, leaving the top of the hanger and the boots for my first layer.  I just love the added dimension this gives to my stamped images!!  


Like the last card, I used the Aqua Painter along with Real Red and Old Olive Ink to color in my Santa suit and the present in the corner.  This really comes in handy when you don't have any or all of the markers to coordinate with the designer papers that you purchased.  

Thanks SO much for stopping by!!

Hope this inspires you to pull out one of your favorite cards and re-create it using NEW papers, embellies and stamps!!

Happy Stampin' Up!!

Jen

Friday, November 14, 2014

BIG ANNOUNCEMENT!!!!

What's the BIG ANNOUNCEMENT you might ask??  Well, here it is....drumroll please....  I have recently joined Stampin' Up!  YUP you read it right!!  This might come as a surprise to you all, but I have been tossing the idea around for a little over a year now.

There have been a LOT of changes in my life over the past 7 months, like leaving my marriage of 25 years in April and filing for divorce in June, going back to school FULL TIME at the age of 43, plus recently leaving the company that I was a consultant for, for 8 1/2 years and joining SU!

All of these changes, while difficult, have made me a much stronger and more determined person!!  I LOVE school and have learned SO much about myself in the process.  Who knew I could be a straight A student after not being in school since I was almost 16!!!  WOW!!  I even surprised myself with that one!

Joining SU! came after not paper crafting for almost 7 months.  Just did not have it in me.  BUT I am finding my happy place again and my creative mojo is coming back to me.  I really can't wait to share with you all my new found love for SU!  Not that it really is a new found love, because I have always loved the products and purchased them even when I was a consultant for CTMH.  BUT I am rediscovering their papers, punches, dies, stamps, ribbons and embellies!!  OH BOY!!  I am in trouble...there is not much that I DON'T want out of the catalog!!

SO on to some art....  I created this card using my FAVORITE sketch blog Mojo Monday and thought it turned out pretty sweet!  Gotta LOVE this little santa from the Get Your Santa On stamp set in the Holiday Catalog!!!  The DP is Santa & Co. that is also featured in the Holiday catalog.


I colored in Santa using the Aqua Painter and Real Red ink.  I have LIMITED supplies right now, so am working with what I picked out for my demonstrator kit.  Good new is...I have a fresh shipment of goodies coming on Monday!!  


This pic is a little blurry, but wanted to show you that by using the Aqua Painter and Real Red ink, I was not only able to color Santa's suit, I also colored in his face!  I just bled out most of the ink onto extra paper, then brushed lightly in his face and it turned out kind of flesh colored!

Thanks SO much for stopping by!!  

I hope this has inspired you to follow me on my new journey with Stampin' UP!

Can't wait to share more with you all!!  

Happy Stampin' Up!

Jen


Tuesday, April 29, 2014

Freshly Made Sketches 133

Thought I would share my creation using the sketch from the Freshly Made Sketches Blog.  I was pretty tickled with the way it turned out!  Although I missed the actual challenge, I still wanted to share!!

Again, I am using the "Free To Be Me" papers from Close to my Heart's National Scrapbooking Month special.  You too can get your hands on this BRIGHT AND CHEERY paper pack starting May 1st through May 31st!!!


I kept this simple, yet sweet as I tend to do MOST of my cards!  LOL  I used Lagoon and Smoothie Baker's Twine from the Paradise Baker's Twine assortment.  LOVE how it adds just a bit of fiber, without taking away from the arrows on the background paper!

Thanks SO SO much for stopping by!!

I hope that this inspires you to play along with the weekly sketch challenges over at Freshly Made Sketches!  I believe a new one is released tomorrow!  Stay tuned for that sketch too!

Happy scrapping and stamping!

Jen

Monday, April 28, 2014

Mojo Monday 343 with Sneak Peak of May's special!!

Recently, I have lost my crafting Mojo.  But if I am going to be honest here, I had lost my Mojo in all other areas of life as well.  This winter was a DOOSY on my spirit.  BUT I am FIGHTING to get it back and I think I am WINNING!!  LOL

You know how I LOVE to play along with the Mojo Monday sketch challenges.  SO I am not only posting THIS weeks sketch, but LAST weeks sketch as well!!

 How do you feel about "signs" in your life?  I believe that everything happens for a reason and that there are signs along the way that tell me things are going to be ok.  As I am sitting here, typing this out, I realized something.  The name of this SUPER CUTE paper pack that will be making its debut in May is called "Free To Be Me".  How fitting that is for where I am at in my life right now!!  No wonder I am falling in love with the BRIGHT AND CHEERY colors and patterns from this pack!!

Mojo Monday 343

May is National Scrapbooking Month, as most of us scrapbookers/stampers know and Close to my Heart ALWAYS has a GREAT special to go along with the celebration.  This year is NO exception!!  Starting May 1st -May 31st you will be able to purchase this pack for just $5 with a $50 purchase.  Check out my website www.jenbennett.ctmh.com for complete details on what comes in the paper pack and how you can purchase it starting May 1st!

ALSO available starting May 1st is the PERFECT stamp for ALL card occasions!  It is the May SOTM called You've Got a Friend.  The COOLEST part of it all is that when you purchase the "Free to be Me" paper pack, with the qualifying $50 purchase, you also get the SOTM for $5!!  I think it is a deal you CANNOT pass up!!

Mojo Monday 342

This card uses one of CTMH's mini stamps called "Perfect Polka-Dot Day".  I cannot tell you how much I LOVE these little stamps.  For just $2.95 each, they go PERFECTLY with most sized cards and they are SO STINKING CUTE!!  I colored this in with a retired Ruby alcohol marker.  The feathers were fussy cut from the feather paper in the "Free to be Me" paper pack.  They were pretty simple to cut out, otherwise I would not have taken the time to do it!   LOL

Thanks SO much for stopping by today!!  

I hope this has inspired you to treat yourself in May to this AWESOME deal that CTMH has for us!!  

Happy Scrapping and Stamping!!

Jen

Tuesday, April 1, 2014

My Lazy Daisy April Flavor of the Month - Creamy Dreamy Delight

Each month, My Lazy Daisy introduces a new Flavor of the Month.  April's Flavor of the Month is Creamy Dreamy Delight and is filled with GORGEOUS neutral fabrics and projects for you to create or add to your always growing fabric "stash"!

If you would like to order any or ALL of this Flavor of the Month collection, website at www.mylazydaisy.net/jenbennett under Flavor of the Month.


Creamy Dreamy Delight is available April 1st through June 30th, 2014 OR while supplies last.   


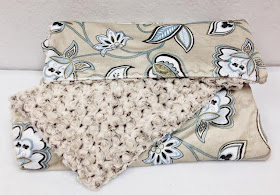
Cotton Collection Kit: Carrying Case (fits a notebook and your iPad). Approx. 20” x 11.5” finished. SKU: 90033. Retail Price is $29.95. 


Cuddle Creation Kit: Florentine (quilt). Approx. 58” x 70”. Soft, minky quilt kit. SKU:  90034. Retail Price is $74.95.


Scallops (72 cotton scallops in soft neutrals, 24 of each size: 4 ½”, 3 ½”, and 2”) SKU: 90031. Retail Price is $22.95


Charms (package of 24 – 5” x 5” assorted cotton prints in soft neutrals): SKU:  90030 Retail Price is $12.95. 


Cakes (package of 24 – 10” x 10” assorted cotton prints in soft neutrals):  SKU: 90029. Retail Price is $19.95


Fat Free Smoothies (package of 6 fat quarters in soft neutrals) packaged in a smoothie cup, complete with a straw. SKU: 90027, Retail Price is $19.95.


4 pack Fat Free Smoothies (comes in a darling tote). $74.95. SKU 90028. Retail Price is $74.95.  


Sprinkles:  A variety of embellishments that coordinate beautifully with our Creamy Dreamy Delight collections (in soft neutrals), hand picked by our experienced staff. Order multiples for lots of variety!  SKU: 90032. Retail Price is $18.95

Can't decide which one to order??  You can have it ALL for just $179.95!!  When you order the FULL Kit and Kaboodle, you will also qualify for $25 in FREE Hostess Rewards!!  Contact me to find out how!

Thanks SO much for stopping by!!

Hope this has inspired you to order some FUN new fabrics and projects that you can add to your "collections"!!  LOL

Happy Scrappy Sewing!!

Jen


Sunday, March 23, 2014

Pillowcase Dress Made into a Pillowcase for ME!

Yesterday, I sat down to put together the Pillowcase Dress Kits that I purchased from My Lazy Daisy.  Thank goodness I had watched Val sew the Minky Pillowcase a couple of weeks ago, or I may have been a bit lost as to how it was all supposed to come together.  Then again, maybe it was a BAD thing to have watched her assemble it as when it came to sewing the side to form the dress version, I ended up sewing the bottom as well.

After realizing that the pillowcase DRESS had just become a pillowcase...I REALLY LIKED IT as it was....a PILLOWCASE!  SO I finished it and put it on my pillow, instead of taking the seam out and completing it as a dress.


It is hard to tell from the picture, but there is a 1 1/4" band that goes between the striped fabric and the floral fabric.  I LOVE this extra touch and will be adding it to all of my pillowcase projects from here on out.  

I don't know about you, but I don't use pillowcases that coordinate with my sheets.  It's not that I don't have any, it's just thatI spend a LOT of time on my pillow and I want it to be FUN and personal.  Not to mention, my hubby and I have the same pillow, so to keep them straight, I have always had to put different pillowcases on them to tell them apart!!  LOL  SO why not have a personalized pillowcase??  When the kids were little, I embroidered their names on the edges of the pillow and sewed Ric Rac at the seam to add a bit more color to them.  

Thanks SO much for stopping by!!

I hope that this has inspired you to go get some fabric and make yourself a pillowcase so you too can have something fun to sleep on!! 

Happy Crafting!!

Jen

Friday, March 21, 2014

Cupcake Surprise Quilt Top

I probably should get back to paper crafting...but I am having SO much fun sewing this last couple of weeks!  My BFF has been coming over on her day off to "play" and I feel like a little kid waiting for our play date each week!

When I joined My Lazy Daisy, the consultant kit included several projects to get us started on our new journey.  One of the kits that I received was the Party Topper - Cupcakes.  While I LOVE the fabrices that come in the kit, I wanted to do something more with the fabric than sew it in a 46" square.

SO I went through a baby quilt book that I recently purchased at my Bernina store here in Omaha and found a quilt that I could make using the amount of fabric that came in the Party Topper kit.

I really feel like these photos need to be rotated...but I honestly don't want to spend the time to do it!  LOL SO just imagine them laying horizontal!!


I thought it would be fun to show you the process of putting it all together!  Kind of cool to see each piece taking shape as they are sewn together.  


After sewing the 3 1/4" square to the 3 1/2 x 6 1/2" rectangle, cut off excess fabric, leaving 1/4 inch seam allowance.


Repeat with 2nd square to end up with partial block below...


Next, sew a 3 1/2" block to both sides of rectangle...


There are rectangles that do not get the squares sewn to them.  They will be sewn to the sides of a 6 1/2" square and will look like the block below...


Sew each layer to create this block...


Then sew 2 blocks together, matching seams, to create 3 rows of blocks that you will sew all together and add 1 3/4" strips of fabric to both sides then top and bottom.


Lastly, sew 4 1/2" strips to the sides, then both top and bottom to complete the top of the quilt.  


I will use the blue fabric as my binding once I have it quilted.  My back will be a soft Minky, which I have not purchased YET!  lol I will not be quilting this myself as I do not have the confidence to do so at this time.  

Let me know if you have any questions!!  

Thanks for stopping by!!

Hope this has inspired you to get out one of those kits you purchased YEARS ago and use it for something completely different than what you purchased it for!!  This was a FUN challenge and I cannot wait to get started on my next project!!  Now to find a baby girl to give this to....

Happy Scrappy Sewing!!  

Jen

Tuesday, March 11, 2014

My Lazy Daisy Projects

Last week I had fun "playing" with my new box of goodies from My Lazy Daisy!!  After almost 8 years of scrapbooking/stamping with Close to my Heart, I forgot how much I LOVE LOVE LOVE sewing!!  There is just something about the hum of the sewing machine and the process of cutting the materials, sewing them together and having a beautiful completed project!!

My BFF and My Lazy Daisy Downline, Val,  came over on Friday to work on the Minky Pillowcase Kit that she purchased from the April Flavor of the Month, Black Bubble Tea.  I have to be honest here...seeing this online, I was not too excited about "needing" to order it.  BUT as with most things, seeing it and feeling the Minky in person in addition to seeing the completed project, changed my mind!!  I now NEED to order it!  LOL


The Black Bubble Tea Minky Pillowcase Kit can be found on my website under Flavor of the Month.  This kit is available during the Month of April, or while supplies last!  


Because the pillowcase took Val NO TIME AT ALL to complete, she SO VERY KINDLY put together these SUPER CUTE Hot Pads from the Farm Fresh Blue collection!  These measure 9x9" and would make a GREAT gift for anyone who has a kitchen in their home!  LOL


Last but not least...this was the tea towel that I completed using the Farm Fresh Brown Ruffled Tea Towel Kit.  This tea towel is HUGE!!  Including the ruffle, it measures 20 x 32".  There are several other tea towel kits to choose from, including one that coordinates with the hot pads above!!  

Thanks SO much for stopping by!!

I hope that this inspires you to either learn how to sew...or dust off your sewing machine and fall in love with sewing all over again!  LOL

Happy Scrapping, Stamping and Sewing!!

Jen


Saturday, March 8, 2014

Embossed Kraft CS Using the Quatrefoil Folder

When I purchased all 5 of Close to my Heart's embossing folders, I had NO idea that I would fall in love with them SO quickly!  Mainly because I had been using other companies embossing folders with my projects for a few years now.

I have gone through phases with embossing over the years as well.  When I first purchased my Cuttlebug and my first few embossing folders, I embossed EVERYTHING!  LOL  Then I tired of the look and forgot about them.  Then I would go online and see the fun cards/projects that people were making with the NEW folders that were coming out.  SO I would buy the new ones and play for a while with them and then forget about them once again!

Then Close to my Heart introduced their 5x7 embossing folders in the Spring/Summer 2014 Idea Book and I fell in love all over again!  LOL  AND that brings me to my card today...


This card was kept fairly simple, yet it turned out pretty darn sweet!  I LOVE the burlap with the Kraft CS and the Lagoon Baker's Twine adds just the pop of color it needed to bring out the Lagoon CS and Lagoon Patterned paper from Skylark.  The flowers were cut at 2 1/2" and 2" using Close to my Heart's Art Philosophy Cricut Cartridge.  The "thanks" sentiment was actually cut out from a larger stamp...one of the perks of CTMH's stamp sets!!

ANYHOO...thanks SO much for stopping by!!

I hope that this has inspired you to play with the different embossing folders and paper that you have in your stash!!  

Happy Scrapping, Stamping and EMBOSSING!!

Jen

Monday, March 3, 2014

Sweet Thank You Card

Today's post is going to be short and sweet!  Well, so is the card!  LOL Last Thursday I had SO much fun staying in my pajamas all day and playing with all of my papers, inks, stamps, embossing folders and embellies.  Much needed therapy, I tell ya!!

One of my favorite size of card to make is the 4 1/2 x 4 1/2 square.  The only problem is it won't fit in a regular sized envelope.  MAYBE I should make it a 4 1/4 x 4 1/4 so it will fit!  Now THAT'S an idea!


There is something about the colors of the Skylark paper pack that I have fallen in love with.  Funny thing is when I first opened the paper pack, I was a bit stumped as to how to work with it because the colors were so similar.  BUT throw in the Kraft CS and the Sweet Leaf and Lagoon colors just come to life.  Add some Burlap Ribbon and it gets even better!

Supplies used for this card are: Kraft, Lagoon, Sweet Leaf and White Daisy CS; A True Thank You; Aqua Dots; Burlap Ribbon; Lagoon Baker's Twine from the Paradise Baker's Twine Assortment; Dots Embossing Folder.  Cocoa, Lagoon and Sweet Leaf Inks were used for distressing.  Sweet Leaf and Lagoon Alcohol Markers were used to color in the sentiment which was stamped in Cocoa Pigment ink.  

Thanks SO much for stopping by!!

Hope this has inspired you to stay in your pajamas all day and PLAY with all of your scrapping/stamping goodies!!

Happy Scrapping, Stamping and Embossing!!

Jen


Thursday, February 27, 2014

Another Week...Another Mojo Monday Sketch!!

This week over at Mojo Monday, the challenge is to create a tall & skinny card using the measurement 3 1/2 x 5 1/2.  I actually REALLY like this size!  It still fits in a regular envelope, yet is a bit smaller and sweeter.  In addition to creating a skinnier card, I put the fold at the TOP of the card instead of on the side.  WHEW this is a LOT of change for me in one week!  LOL

Here is the sketch from the blog...

And here is my version....


For my card, I used the elegant papers from Skylark, sentiment from Holiday Tags and flowers cut from Art Philosophy.  The wooden button is from the Wooden Medley Assortment, Lagoon Baker's Twine is from the Paradise Baker's Twine Assortment and the Sparkle Flourish...well that is from the Sparkle Flourishes (small, I believe).  

Lagoon Scalloped Circle is 2 1/2", Large Flower is 2 1/2", Smaller Flower is 2", Kraft Scalloped Circle behind button is .90mm.  The 1" scalloped circle was too large, the 3/4" scalloped circle was too small.  SO I changed my Cricut setting to mm instead of cm so I could get an in between size.

Thanks SO much for stopping by!!

I hope that this has inspired you to play along this week over at the Mojo Monday Blog!!

Happy Scrapping and Stamping!

Jen