Showing posts with label Bitty Sparkles. Show all posts

Thursday, September 8, 2011

WOW OH WOW!!!

I have once again let this blog go WAY TOO long without a post!  I really have NO good excuses that I can use.....SO I am just going to share a few more things that I created back in July for my Extravaganza Class that I taught.  Each of these cards were created using the NEW paper kit Typeset from the Autumn/Winter Idea Book.


First card was created using the stamp set Love Birds.  The Juniper Ribbon is from the Designer Ribbon Green Collection and the Pewter Buckle if from the Foundry Ribbon Slides.


The 2nd card uses the stamp set A Twinkle along with Licorice Opaques and ribbon from the Black Mini Medley collection.  The sparkle on the star was made by using Liquid Glass and Prisma Glitter over the cut out part of the star.


This card was created using the September Stamp of the Month Limited Edition.  The C is from the Dimensional Elements Monograms.  Sparkles and Black Ribbon from the Mini Medley collection finish off the card.  Simple, but sweet.


The base to this circle card is available in the Autumn/Winter Idea book to make creating Circle cards SO much easier!  The Butterfly is from the Flutter Just Blooms and the antennae are pearl stick pins that are included in the Bling Collection.  The pearls in the butterfly are the Pearl Opaques AND Ribbon slide is from the Pewter Mini Medley collection.


Last but not least.....Stamp set used for this card is Blue Ribbon.  All embellishments have been mentioned above!

Thanks SO much for stopping by today!!  I will TRY my hardest to NOT let 2 months go by without posting again!  I still have a few more cards and projects just waiting for you to see......

Hope these cards have inspired you to purchase the paper pack Typeset from my website OR from YOUR favorite CTMH consultant!!  

Happy Scrapping and Stamping!

jen

Tuesday, November 9, 2010

16 Card Mistletoe Workshop

Back in September, I attended a craft fair as a vendor to showcase Close to my Heart products.  Well, we had a pretty good crowd in the morning, but in the afternoon the Huskers had a football game that was not only televised BUT was also playing at home.  That meant that everyone started heading either home or to Lincoln around noon.

The reason I am telling you all this is because I had brought with me the supplies to put together 16 cards using a cutting guide that came with the Everyday Celebration Card Kit that was a special about a year or more ago.  So, I cut and assembled all 16 cards that day and finished them 2 weeks ago at a crop that I attended.

I just LOVED the way they turned out!  The photos really do not do them justice as in person they sparkle.  Again, if you would like to see it up close and personal, just click on the picture!


The card above uses the Star Dust Glitter Pen for the steam coming up from the cup.  I used Cocoa Ink 2nd generation and then the glitter pen over the top of it.


If you click on the card above to view it larger, you will see there are bitty Pearl Opaques dotted on the tree.  Kind of hard to see the little details from these photos.


The card above uses the November Stamp of the Month "A Little Thanks".  I am LOVING this set!!  


The ornaments are from the Mistletoe Workshop on the Go Kit on page 25 of the Autumn/Winter 2010 Idea Book.  The stamp set is only available for purchase with the WOTG kit until January 31st 2011.

Supplies used: All CTMH and available!
Paper: Mistletoe Level 2 Paper Pack
Stamps: A Timber, Jingle Borders, A Sip, Stamp set from Mistletoe WOTG Kit, A Little Thanks (November Stamp of the Month)
Inks: New England Ivy, Cranberry and Cocoa
Embellishments: Colonial White Ribbon Collection, Cranberry Ribbon Collection, Bitty Sparkles, Sparkles, Pearl Opaques, Pink/Red Sparkles
Tools: Star Dust Glitter Pen, Pop Dots and Glue Dots

Thanks SO much for stopping by!!'

I hope that this has inspired you in one way or another.  Maybe it will inspire you to get your Christmas cards done if you have not already.  Maybe it will inspire you to get out your Sparkles and Pearl Opaques and USE them!  LOL  OR Maybe it will inspire you to get out your stamps and just play......

Happy Scrapping and Stamping!!

Jen

Tuesday, May 4, 2010

AWESOME FLOWER TUTORIAL.....

I ran across this awesome tutorial over at Patty's Stamping Spot where she shows how to create this awesome paper flower using a paper crimper.

For my flower, I used a corner rounder without the guard and scalloped the edges. For the leaves, I used my 1 1/4 inch punch as shown below.....

The center flower is about 3 inches around.  So, I made the card a 6x6 and used a card pattern from Originals.  The flowers up the left side, corner flourish, word bloom and words on the stem are all from the CTMH Primavera Rub-Ons.  Talk about easy!  I added a few sparkles in the centers of the flowers for a little bling.


I followed the leaf instructions up until Patty cuts them out by hand.  I used my 1 1/4 inch punch instead and then inked them in Sweet Leaf for a bit more dimension.


  You can make the leaves different sizes depending on where you put them into the punch.....


Supplies used for this project are all CTMH (unless noted):

Paper: Cherry-O stripe, Crystal Blue CS, Tulip CS, Colonial White CS and Chocolate CS
Inks: Chocolate, Tulip
Embellishments: Sweet Leaf ribbon, Bitty Sparkles, Primavera Rub-Ons
Tools used: Paper Crimper (non ctmh) and 1 1/4 inch punch available now from CTMH!!

Thanks for stopping by!! 

I hope this inspires you to check out the flower/leaf tutorial and give it a try!  I really had fun creating this flower and will be making many more!  Maybe in different sizes too!

Happy Scrappin' and Stampin'

Jen

Wednesday, March 31, 2010

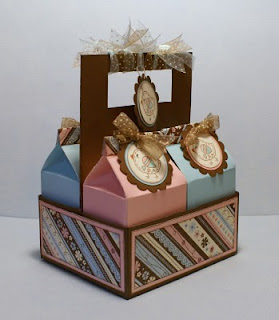
Isn't this just the cutest??

little container that you have ever seen?  OK, maybe not THE cutest, but pretty darn close!  I purchased this awesome tutorial from Becky Roberts over at www.inkingidaho.blogspot.com  .  I also purchased quite a few other tutorials from her that I can't wait to sit down and play with!!


I used Close to my Heart's "Topstitch" papers and the sweet little birdie is from the stamp set "Love You Forever".  It is hard to tell from the picture, but each of the little birdies has a Bitty Sparkle for it's eye.  I also used Heavenly Blue and Chocolate ribbons, each from a ribbon round collection.


For the circles and scalloped circle, I used SU!'s scalloped punch, 1 1/4 and 1 3/8 inch circle punches.  OH and since I did not have the punch that Becky used for her handle, I used my paper trimmer and trimmed out a piece for the handle.

This really was a lot of fun to make!!  I think that the next one that I make I will do a little random stamping on the milk cartons and on the part of the holder that shows.  Now to decide which papers and stamps to use!  Oh the possibilities!!

Thanks for stopping by!!

I hope that I have inspired you to check out this SUPER CUTE little Milk Carton and Holder tutorial over at Inking Idaho.....or to make one on your own!!  I would, if I could, but I can't, so I purchased the tutorial!  LOL

Jen 

Thursday, February 25, 2010

A simple 3x3 card.....

I created this little 3x3 card this afternoon to be sent to Close to my Heart as part of an art submission for a chance to teach at convention this summer. I thought it turned out sweet, but simple. Sometimes, simple is hard for me because I always feel like it is missing something.....


It is hard to tell from this picture, but I added Prisma Glitter to the little dots along the stem, each flower petal and the inside of the flower. I had tried Bitty Sparkles first, but they were too big and took away from the daintyness (is that even a word?lol) of the flower and flower stem.
The papers are from the Close to my Heart paper pack "Caboodle" and the stamp set is "Smiles". I could play ALL day with these colors and stamps! These very well could be my most favorite since "Animal Cookies". TOO CUTE!!!
Well, my laundry is creeping outside of my laundry room and is starting to take over my kitchen....not quite sure how that happened soooo fast....LOL I guess I had better go put some bath towels in, cuz drying off with a hand towel is NO fun! Ask me how I know......ROFL.....Hey, I eventually got dry after the 2nd hand towel....HA
Thanks so much for stopping by today!
Maybe you will be inspired to move out of your comfort zone and create something different than your norm..... If you do, leave a comment and link to your art! I would love to see it!!
OH and if you live locally, check out my Meetup Group, Scrappin' and Stampin' Made Beautiful but Easy. This is a place where we share our art, chat about what's new and Meetup for crops, workshops and scrapbook groups ocassionally. Just go to Meetup.com and search for my group! Like what you see? Sign up is FREE! Would love to have you join us!!
Jen