Showing posts with label Cricut Art Philosophy. Show all posts

Saturday, March 8, 2014

Embossed Kraft CS Using the Quatrefoil Folder

When I purchased all 5 of Close to my Heart's embossing folders, I had NO idea that I would fall in love with them SO quickly!  Mainly because I had been using other companies embossing folders with my projects for a few years now.

I have gone through phases with embossing over the years as well.  When I first purchased my Cuttlebug and my first few embossing folders, I embossed EVERYTHING!  LOL  Then I tired of the look and forgot about them.  Then I would go online and see the fun cards/projects that people were making with the NEW folders that were coming out.  SO I would buy the new ones and play for a while with them and then forget about them once again!

Then Close to my Heart introduced their 5x7 embossing folders in the Spring/Summer 2014 Idea Book and I fell in love all over again!  LOL  AND that brings me to my card today...


This card was kept fairly simple, yet it turned out pretty darn sweet!  I LOVE the burlap with the Kraft CS and the Lagoon Baker's Twine adds just the pop of color it needed to bring out the Lagoon CS and Lagoon Patterned paper from Skylark.  The flowers were cut at 2 1/2" and 2" using Close to my Heart's Art Philosophy Cricut Cartridge.  The "thanks" sentiment was actually cut out from a larger stamp...one of the perks of CTMH's stamp sets!!

ANYHOO...thanks SO much for stopping by!!

I hope that this has inspired you to play with the different embossing folders and paper that you have in your stash!!  

Happy Scrapping, Stamping and EMBOSSING!!

Jen

Tuesday, December 10, 2013

Is it too early for New Year's resolutions?

I have been busy keeping up with my Facebook page, but keep neglecting to stop over here to post as well!  SO I am making my New Year's resolution a bit early...or is it a bit late?  Either way, each time I post to my Facebook Page Jen's Scrappy Pages, I will post here as well!!  I may not have a LONG LENGTHY post each time, but I know what you really want to see....ART!!  lol

Each month I participate in 2 different swaps.  The Humble Artist's Swap, as I had posted last time.  But I also hold a monthly swap with consultants from my team and also a few fellow consultants that are not on my team.  I LOVE participating in swaps because it forces me to sit down and challenge myself to create something with a specific color scheme or paper pack.

For our team swap in November, we used the papers/colors from the Frosted papers and I chose to created something from one of Close to my Heart's Cricut cartridges.  Art Philosophy was the first cartridge that CTMH introduced in 2011 and I hate to admit it, but with the introduction of Artiste in 2012 and Artbooking this summer, I forgot how stinking cool Art Philosophy is!!!

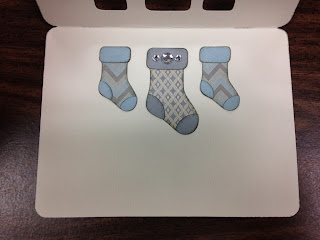
 Having said that, I created this sweet stocking card using the Card function on the cartridge.  What is SUPER COOL about it is that not only does it cut out the little stockings from the center of the card, you can also cut out each stocking separately.  In addition to cutting out each stocking, you can cut out the toes, heals and top of the stocking for added dimension!


I chose to cut out each stocking and adhere it to the inside of the card.  You can also use paper to back the front of the card, which would be less time consuming and still make a cute card!


After I made the stocking card for my team swap, I decided that this would be a GREAT project for our team meeting!!  SO I went through the different images in the Card function of the cartridge and came up with the tree card below.  


I still used the paper from Frosted...just changed up the color for a more Christmas feel!  The tree in the center was cut from Close to my Heart's gold glitter paper.  LOVE this stuff!!!

Thanks SO much for taking the time to stop by my neglected blog!!  

Hope this has inspired you to get out your "old" favorite CTMH Cricut cartridge and find some NEW fun projects to make with it!!

Happy Scrapping and Stamping!

Jen


Tuesday, October 9, 2012

Dakota and Flakey Friends??

I just returned from an AMAZING scrap weekend with my girlfriends!!  I laughed SO much over the past 4 days that I am pretty sure I got a nice ab workout in without really having to work at it!!  We have been planning out this weekend for 6 months and I cannot believe it is already over.  When we first started getting together for our weekend scrap retreats a couple of years ago, we would start on Friday night and go through Sunday noon.  NOW we go from Thursday afternoon till Sunday evening!  This time we even talked about planning a WHOLE WEEK in the summer!  I wonder what will be next....a 10 day cruise??  LOL


ANYHOO...I got a TON done....I worked on my Card Class cards for October and December (November were already completed).  Plus finished my scrapbook pages for my December Scrapbook Group.  After I completed the projects that I NEEDED to get done...my girlfriends INSISTED that I work on my own stuff....SO I started playing with one of my FAVORITE paper packs, Dakota AND one of my favorite new stamp sets "Flakey Friends".


Who knew Dakota and Flakey Friends would be SO STINKING CUTE together???  I LOVE playing with papers and using them for something COMPLETELY different than what they were intended for. I added Crystal Blue to brighten it up a bit and OH MY GOODNESS did I have fun playing with it!


You know....I just realized that I USED to list my embellies and papers at the bottom of each post!  SO I think I will start doing that again!  STARTING TODAY!

Supplies are ALL CTMH and can be found on my website to order! 
Paper - Dakota with Crystal Blue CS added
Stamp Set - Flakey Friends 
Inks - Staz 0n Black, VersaMark, Black (for distressing) Ruby and Twilight Markers
Embellies - Black Sparkles (black and grey assortment) Black Sparkle Flourishes, Black Tulle, Black Opaques, Black Hemp, Pewter Badge Buttons, Pewter Mini Medley, Color Ready Ribbon
Tools - Embossing Gun and Edge Distresser and Cricut Art Philosophy
Other supplies used - Clear Embossing Powder, Glue Pen, Prisma Glitter

HOLY SMOKES that is one HUGE supply list!!  It was SO much fun using all of my WONDERFUL CTMH products to create these cards!!  There are MORE to come....so STAY TUNED!!

Thanks SO much for stopping by!!  

I hope this has inspired you to DO SOMETHING FOR YOU today!!  Schedule some YOU time and just PLAY!

Happy Scrapping and Stamping!!

Jen


Friday, April 20, 2012

A couple of cards using Cracked Glass Technique

There are some techniques that I fall in love with, create a bunch of stuff using it and forget about it once I learn the next cool technique.  That was the case with this technique.  I was going through my scrapbook room, you know doing the quarterly clean out, and ran across something that had this technique used on it.  SO I thought I would give it a try with this new stamp set from CTMH "Quick Cards Butterfly" and the GORGEOUS paper from "Florentine".


 Honestly, I am not even sure if this is the correct name for the technique.  BUT we are going to call it Cracked Glass for this post!  For this technique, you need Versa Mark, Clear Detail Embossing Powder and a Heat Gun.  Simple so far!  After you have stamped your favorite image on a piece of CS, you will cover the ENTIRE piece of CS with Versa Mark...then pour the Embossing Powder all over the top so you have a nice layer of powder covering the entire piece of CS.  Heat until melted.  Repeat the VersaMark and Embossing Powder step again.  Heat until melted.  This time, while the embossing powder is melted and still hot, cover again with embossing powder, heat till melted and repeat these steps until you have about 5-7 layers of embossing powder.  


Once you have the number of layers that you like on your image, let it cool completely.  I have seen where some will put it in their freezer to speed up the cooling process.  Once completely cooled you will very gently fold the image until the embossed layers start to crack.  You can crack it as little or as much as you would like!  After I cracked mine, I added a bit more ink to the top, so as to get into the cracks and around the edges....for  a more antiqued look.

I am sure there are youtube tutorials out there on how to create this technique.  I just don't have time right now to post a tutorial!  BUT I hope that you were inspired to try this technique out if not for the first time, maybe revisit the technique with new papers and embellies that you have in your stash!!

Thanks SO much for stopping by!!

Happy Scrapping and Stamping!!

Jen